Vacuum Forming Process - Explanation, Schematic View & Video
The vacuum forming process works by heating a plastic sheet, forming it into a shaped vacuum forming tool using vacuum, cooling the plastic sheet until it sets hard & then removing the part from the tool. Below, the full process is explained step-by-step with illustrations. Read on for vacuum forming tool notes, design tips and a video of the process in action.
Diagram & Explanation of the Vacuum Forming Process
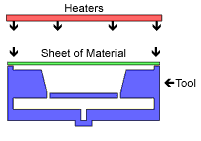 |
1. The vacuum forming tool is loaded in to the vacuum forming machine and warmed. 2. The plastic material, in roll or sheet form, is loaded on to the vacuum forming machines material carrier. 3. Heaters, located above the sheet, then heat the sheet of vacuum forming material until it softens. |
|
4. An automatic levelling device then supports the softened sheet of vacuum forming material with air. 5. The tool is raised to meet the bottom surface of the sheet of material and a vacuum of air is applied in order to draw the sheet over the shape of the vacuum forming tool. |
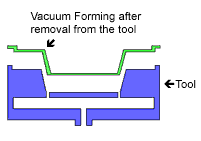 |
6. The plastic is cooled with air to set hard. The vacuum forming can be removed by hand or with the use of air to carry out any necessary secondary operations e.g. trimming (by hand or with a roller cutter) or hole punching. |

Vacuum Forming Process Video
To see the process in action, watch our video. Or carry on reading for tool and design tips.

Aluminium v.forming tool

Resin cast v.forming tool
Vacuum Forming Tool advice
Once you have finalised the design & material type of your vacuum forming product, a vacuum forming tool has to be made which comprises of the shapes and features you need for the plastic part.
Vacuum forming tools generally cost £ 1000 - £ 1500 as they are made from lower cost aluminium instead of hardened tool steels or alloys & do not require the same accuracy as an injection moulding tool. Vacuum forming tools can even be made of wood (only suitable for very short production runs) or, if the product exists already, a tool could be resin cast from it !
The plastic vacuum formings cost significantly more than injection mouldings. This makes vacuum forming better suited for low - medium volume requirements where the need & thus cost of an operator or technician producing each forming does not counteract the initial low cost of the vacuum forming tool.
Vacuum forming design process - 5 simple tips
When designing your product for the vacuum forming process, please remember that all sections must have the same wall thickness and that holes and slots will have to produced as a secondary operation.
1. Injection moulding is much more suitable for tight tolerances than the vacuum forming process
2. If possible, make the gaps between pockets greater than 6 mm, otherwise webbing is likely to occur.
3. Ideally, allow 5° - 10° draft angle on side walls to enable the formings to be easily removed from the tool.
4. Don't make pockets deeper than their width & avoid very narrow slots - they're unlikely to form properly
5. To stop formings thinning excessively/cracking use large (3 mm+) curves/radii & avoid sharp corners
Need more detail ? View our Vacuum Forming Design Guide for more detailed advice on draft angles, pocket depths, undercuts & more.